Thursday, December 11, 2014

Holiday look: Gold/Glitter Holiday Glam

Hi Lovelies! <3


Today's Thursday and you know what this means! ANOTHER BLOG POST! Yay! Lol, So I created another Holiday look for those who may be interested and want some ideas for the upcoming holidays. I recently posted on my Makeup instagram page a "Holiday Glam look." (@moreofkristinaThis look definitely had Gold written all over it! I ended up loving the finishing result, and had to make a blog post on the details that created this look. As always, down below, I will list the products I used along side with some photos. Thanks for visiting my blog and enjoy <3


Simple yet glamorous holiday look for ya'll. Again, I used another lip color to those who don't want to wear a nude lipstick:


EYE MAKEUP DETAILS:

Top Palette: 
  • Urban Decay Naked Palette, I used the color "Half Baked" all over the lid. I also used Urban Decays "Heavy Metal Glitter Liner" in "Midnight Cowboy", which is a Gold glitter liner on top of the gold eyeshadow. Also from the Naked Palette, I used "Virgin" on the inner corner of my eye also known as the eye tear duct. 

Bottom Palette:
  • Sonia Kashuks Natural Palette, I used #1 for the brow bone, #4 & #7 for my crease (mixed the two colors) & #9 for the outer corner to give my eye some dimension and a smokey effect. 

  • Red Cherry False Lashes in #415
  • TooFaced "Better Than Sex" Mascara on top and bottom lashes


FACE MAKEUP DETAILS:

  • YSL Le Teint Touche Eclat Foundation in BD 40
  • NARS Radiant Creamy Concealer in Custard
  • Anastasia Beverly Hills Contour Palette "Banana" to highlight under the eyes (also a setting powder)
  • TooFaced Chocolate Soleil Bronzer to contour and bronze up my face
  • MACS Melba blush 
  • BECCA Opal Highlight 
  • Anastasia Beverly Hills Dipbrow Pomade in the color "Dark Brown" for my brows


LIP DETAILS:

Red Lips are: Revlons Color burst Lip Stain in "Rendezvous"
Nude Lips are: TooFaced "Nude Beach" Lipstick


I hope you enjoyed this blog post, and got inspiration to do a look for the holidays. As always, leave comments on suggestions you would like to see featured on my next blog post. Share, Like, and keep supporting my blog. Love you guys! & thanks for visiting! 


BESOSXO Kristina

Sunday, December 7, 2014

Holiday Makeup Look: Copper & Brown

Hiiiiiii Everybody!!!


***I can't believe it's already December!!! I haven't put up a November Favorites Blog only because my OCTOBER FAVORITES is pretty much the same products I've used up in November. Being said that it's already December, I am loving new products I came across, so look out for a December blog at the end of the month or beginning of January 2015! 


I am very excited to announce that this blog post will be my very first makeup look and with the details I've used creating my Holiday look! It's such an exciting feeling! I love doing makeup, it's a passion of mine and I aspire to be a makeup artist one day. I am self taught, so I don't have a certificate at all if you're wondering! Also! To see more of my looks, please follow my instagram page which is @MoreofKristina  where I will update you on more looks I've done! STAY TUNED! Xo


This is the look I came up with:


I gave you the option of two different lip colors. The one on the left I am wearing TooFaced: Nude Beach & on the right I am wearing Milani's Black Cherry lippy! My personal favorite is the dark lip choice, but if you're a nude girl, the one on the left will work perfectly fine ;)

On the eyes I am using:
  • BH Cosmetics Galaxy Chic Palette and the color is Mars on the lid area
  • Sonia Kashuks Natural Palette, light brown and orange color on the crease, black on the outer corner and inner corner, and a dark brown on my bottom lash line smoked out. In the tear duct area, I am using my Naked Palette from Urban Decay "Virgin", I dabbed on the center of my lids with half baked from the urban decay naked palette & as for lashes they are Red Cherry "47" lashes.
Face Products:
  • YSL Le Teint Eclat foundation in b40 
  • Nars Radiant Creamy Concealer in Custard
  • MACS Melba Blush
  • Anastasia beverly hills contour palette (fawn: contour, Banana: highlight under the eyes to set the concealer)
  • BECCA Opal as a highlight
  • Anastasia beverly hills dip brow pomade in dark brown for my eyebrows to fill them in
  • TooFaced Chocolate Soleil bronzer, to blend out the contour and give me color


A closer shot:


I hope this blog post was helpful to those who were interested in this makeup look. More holiday looks will be coming very soon, to stay posted follow my makeup page on instagram (@moreofkristina) There will definitely be more pictures posted this week and the following! I love you guys! As always, leave comments, and suggestions on what you would like to see next! share and continue your support, it means so much to me <3 

BESOSXO Kristina


Monday, December 1, 2014

Daily Skin Care Routine

Hi Everybody!!! <3

**Again, I Apologize for not posting as much, but I've been so busy with school as far as midterms and upcoming finals, and work! BUT, I promise to keep my word and blog weekly! Thank you to my supporters who have been patient with me, You are appreciated! Love love love you's!** 


Today's blog post is my Skin care routine, and what I do and use on a daily basis! Since I'm usually busy in the day time, I do my skin care routine at night, that way I can sleep with a clean face and start fresh the following day! I know some people prefer to wash their face twice a day, which is always good, but since I don't have much time, I always forget to wash my face in the morning, but I wait till the night to clear any bacteria or just anything on my face to wash my face.


Here's what I do first:

  • Since I usually wear makeup almost everyday, I definitely have to use a makeup remover. The makeup wipes that I use are the Simple Radiance cleansing wipes (25 wipes) I've gone through a million and one makeup wipes, and ever since I tried this, I've been in love. It doesn't have a pleasant scent, but I think it's much better because I have really sensitive skin and if a makeup wipe has a strong scent, I will break out the next day. And these wipes are 100% clean, no residue, No Harsh chemicals, no Artificial perfume or dyes. So, these wipes are good for my skin because it's simple, no pun intended. Haha! But, ofcourse everyone is different so this may not be gentle on your skin, or you use something else. Which is totally fine! Honestly, it really makes my skin soft right after, and it gets the job done. It even takes off my waterproof mascara, and that's always hard to come off, Am I right ladies? So, these just happen to be my favorite makeup wipes right now, and they make my skin feels good right after!


But, don't think just a makeup remover is going to clean your skin because it really doesn't. To wash my face I use:


  • Cetaphil Daily Facial Cleanser: (which is on the top right) This is for normal to oily skin ladies and gents. So I've started using this product for a month now and I feel like it's time to make a mini review on it here on this post. This facial cleanser cleans you UP Girl! To use this, you have to have your face wet with warm water, and then you apply a generous amount (one pump is perfect, a little goes a long way!) to your fingers and massage it thoroughly on your face. You don't need to leave this cleanser on for any amount of minutes, you can rinse when you feel like your skin is clean. Which it takes me about a 30-45 seconds for me to have that feeling (unless you had a lot of makeup on that day, then I would gently massage the cleanser for a minute) but, after I do that; I rinse with warm water. The cleanser feels like a silicone gel in a way (does that make sense?), it has no beads or anything inside it. Just straight up gel. I know this product says its for normal to oily skin people, but since I have normal skin, I do feel dry after the cleansing. And this is where I use my next product:
  • Cetaphil Daily Advance Lotion: This lotion is so hydrating to the skin. For those who have severe dry skin, this will be your BESTFRIEND. I'm not even joking, I've used this lotion for years now, and is the only lotion I use and will forever use. This is my holy grail product, hands down. I apply a generous amount (a little goes a long way, trust me!) and put this in areas where I feel like I need hydration which is around my cheek, chin, sides of my nose and forehead. Everywhere else I get really oily, so If I were to place the lotion in the areas where I get oily, I will be even more oily. So, be careful to not focus on the oily parts of your face with this lotion, because it will cling on to it and make you shiny. (Lesson learned!) 

After I apply my lotion, I use:


  • This is the Origins GinZing Refreshing eye cream. I use this eye cream almost everyday, whenever I think about it, haha, just being honest here. I believe I've mentioned this product on a previous blog post, and I've gone in depth how I felt about it etc. Nonetheless- This eye cream does help brighten my designer bags, lol, Ofcourse, you would have to be consistent with this product to eventually see results. It won't happen over night, but when I've used it for almost about a month straight, I did see results. My dark circles (Designer Bags) brightened up a bit. Since, I've seen results, I've been back on this product and have been using it, and love it!


And lastly,


  • For the days I have breakouts, I use the Clean & Clear advantage acne spot treatment. I've been using this treatment forever, and again this is one of my holy grail products. It honestly, helps reduce the size of your pimples/breakouts from getting bigger and annoying. It dries out my pimples, and goes away on its own. This stuff is like magic, no kidding. On the bottom picture, you can see a tiny amount of the product on my hand, and it feels like a silicone gel consistency. The only thing I would be careful with when using this product, is to not use this on popped pimples because it will burn and it's not a nice feeling- trust me! Overall, this product is great for me, everyone is different and has their opinions, but it works well for me. Again, let me clarify that a little goes a long way with this product. This same product I've had for over 6 months, and I still haven't ran out, and I do use this almost everyday. So it's definitely a must have, and the price isn't much neither! I definitely recommend this to those who are in need of a acne spot treatment!


So there you have it, this is my Daily Skin Care Routine, and have been doing this for a while now, even if I used different products, the order of my routine is how I do it on a daily basis. I hope this blog post was somewhat helpful to those who are confused as to what they should use for their skin. Of course, before buying any of these, test it out to see if you have a rash or breakout after, because everyone is different. I would also recommend checking in with your doctor to see if any of these products may be harmful to you. Nonetheless, I hope this blog post was informative and you enjoyed it. Thank you to those who continue to support me even when I haven't been consistent with my blog posts, I appreciate all of you! Definitely share this blog post to someone who might be interested! :) As always leave comments on what you would like to see on my next blog post, like, share, and thank you for checking out my blog!

BESOSXO Kristina

Thursday, November 13, 2014

Product Review: Bobbi Brown's "Scotch on the Rocks" Highlighter

Hey Everyone!


So, this blog post is going to be a product review on Bobbi Brown's new limited edition "Scotch on the Rocks" Highlighter. They have two, one called Pink Glow and one called Bronze Glow. The one that I bought was the BRONZE GLOW. It retails for about $45.00, and I'm not sure if they still sell it in Sephora anymore, I just checked their website and it's not there. You can check in stores too, but Nordstrom, Bloomingdales, and Neiman Marcus sell it. 


The highlighter comes in a great marble like packaging, I mean Bobbi Brown's packaging are always *thumbs up!* As soon as you open it, it has a decent sized mirror, and the product is laid flat with amazing texture, and pattern. This highlight is sent from the Makeup Gods above! I absolutely loved it when I first opened it.


Here's bronze glow swatched on my finger, and then on my hand. This highlighter is perfect for all skin types in my opinion. Fair skin- mainly as a blush on top of your bronzer to give you that beautiful glow. Medium skin- to apply above your blush/bronzer to give you that gorgeous glow as well, and for Dark skin- This can work for your highlight or even a blush too! 

I feel like this is a versatile product too! You can substitute this as a eyeshadow, your highlight, bronzer, blush etc! It works good for anything. The feeling of it is almost buttery, not flakey whatsoever! 


Here's how it looks on me, and I am Fair to Medium Skin:


#ExcuseTheMessyHair Lol!


As you can see, it photographs lovely (I used flash for all these photos) and I am beyond obsessed with this highlighter. At first, I thought it was a little too dark to use it as a highlight, but it worked so well and applied so nicely. Also, one thing about Bronzy Highlighters is that some of them can make you look "Muddy" or "Dirty" this one doesn't do that at all! It's so natural looking and gives you that "Jlo Glow!"


These are some photos I took without the flash option:


Either way, this highlight will give you LIFE girl! If you're a highlight junkie like me, I recommend you get this highlighter like now before they stop having it on the market! I'm sure theres other dupes to this highlight, but for now, if you have some money you want to spend, and is in need of a great highlighter. Get it! I promise you, you will love it as much as I do :) This is slowly becoming one of my favorites, I mean it was featured in my October Favorites in my last blog post. Haha, but in all serious-ness; I actually really like this highlight, It compliments my skin so well, and I have gotten compliments while wearing this highlight. :)


I hope you enjoyed this blog post, and gave you ideas about this product. I'm not trying to sell this product, I'm just helping my girls out there who are in search for a great highlighter, and this so happens to be one of my favorites. As always, leave comments on suggestions of what you would like to see next on my blog. Please share, comment, like, support! I would greatly appreciate it! Love ya! 


BESOS  XO KRISTINA

Monday, November 10, 2014

October Favorites♡

Hey Everyone! 


So I know I've been "neglecting" my blog for about 2 weeks now maybe even 3, but I wanted to do an October Favorites since I feel like it's more of an easy blog post to get up and to make up for times lost. Better late than never right? A lot has been going on these past few weeks, I celebrated my Birthday on October 30th, and I just been busy with school studying for tests, etc. A lot has happened emotionally too, but I won't get into that because it's a lot and off topic for this blog post. That could be another post for another time! Anyways! Down below will be my October favorites, I hope you enjoy this blog post! Xo


Here they are:

  • MAC Melba blush
  • Tartes Amazonian clay blush in Tipsy
  • Becca Opal Highlighter
  • Bobbi Brown Scotch on the Rocks Bronze Glow Highlighter
  • Smith's Rosebud Salve Lip Balm
  • YSL Le Teint Touche Eclat Foundation in B-40
  • NARS Creamy concealer in Custard
  • Anastasia Beverly Hills Eyebrow Gel in Clear
  • Rimmel London Lash Accelerator Mascara
  • TooFaced Better Than Sex Mascara
  • Studio Beauty Makeup Remover in Night Calming (The Best!)
  • Benefits Porefessional Face Primer 
  • Benefits Hoola Bronzer


I know it doesn't look like a lot of stuff, but these are the items I have been reaching for pretty much everyday, and in my opinion are AMAZING! Most of these items can be purchased at Sephora.com or in Sephora Stores! The two things that can be purchased in other stores are the MAC Blush, in the MAC store or online, and the Rimmel London Mascara which you can purchase in your local drugstore. I got mine in CVS. 


Non beauty favorites:


Since a lot has been going so far, I've been reaching for The Secret by Rhonda Byrne, and this book is simply amazing. So positive and teaches you the way you should be thinking. If you're having a hard time in your life and you need a "pick me up" or re-assurance, I guarantee you this book can do that for you. I definitely recommend it! 

The Beats Pill in Pink I got for my birthday from my mom, and since I got it, I have been listening to my music non-stop on this little thing! It may look tiny, but the speakers are so loud, and clear! 


Favorite Songs:

Habits- Tove Lo
Time for Love- Chris Brown
Love Me Harder- Ariana Grande ft. The Weeknd
Magnet to Steel- Rupee (An oldie, but goodie!)


So, I hope this blog was somewhat entertaining, and gave you some ideas to try out some of the things that I have been loving in October! I apologize for not being very informative in this blog post, I seriously haven't had much time to be in depth with the products I listed for many reasons. I promise you, in my next blog post I will be very informative and helpful. I hope you understand, Thank you so much for viewing and supporting my blog! I really appreciate it, and hope I didn't disappoint any of you for not being active on my blog for a few weeks. But now I'm back and better than ever, and have many ideas for the upcoming days/weeks. Much love, please share, leave comments and suggestions on what you would like to see next! 

XOBESOS KRISTINA

Tuesday, October 21, 2014

DIY: Lip Scrub

Hey Everyone!


So, I know many of you may be approaching some cold weather or probably already experiencing some cold weather (I know I am, which is crazy New York City) I figured, this blog post will be a great way to do a DIY (Do it Yourself). And this DIY project is on how to create your own lip scrub. The cold weather may have an affect on our lips and make them look dry, crack, or peel, which can suck for our poor lips :(. BUT! This DIY lip scrub will be perfect for those chappy lips boo boo, lol. And, the coolest thing is that all the products you will need are right in your kitchen cabinets. :)


What you will need is:

  • Organic Coconut Oil
  • Cinnamon
  • A Container for your lip scrub
  • Food Coloring (any color you want)
  • A spoon
  • A Mixing stick, or popsicle stick (Forgot to photograph it :/ )
  • & 1/4 cup of Sugar


    **************************************


    How to do your lip scrub: 


  • You're going to need your spoon to scoop up 2 teaspoons of coconut oil, then you pour it into your container.


  • Then you grab your 1/4 measuring cup of sugar and pour it into the container filled with your coconut oil.


  • Get your Cinnamon and scoop up half a teaspoon of it and pour into your container.
    (The cinnamon is for flavoring and scent, incase you were wondering.)


  • Then grab any food coloring you own (Any color you want, there's no specific color) and drop about as many drops as you want, to your liking. I dropped about 6 drops only because I wanted my scrub to look really "hot pink" or "red."


  • Then lastly, mix your ingredients until you get this kind of consistency. If you feel like it may be too oily, add a bit more sugar, or if its a bit more sugary add a bit more of coconut oil.


    Here's a demo video of me using my homemade lip scrub:


Here I am using the Lip scrub I made, and I'm pretty much scrubbing it onto my lips. You can use either your fingers or a baby tooth brush if you really want to get in there and scrub those lips! Either or is fine, both do the same job. You want to scrub your lips for about one minute, and then rinse your lips with warm water, dry them, put on your favorite lip balm and, wa-lah! You have smooth lips ;) 


These are my favorite lip balms to use after I scrub my lips:


EOS lip balm in sweet mint
Smith's Rosebud Salve
Vaseline Lip therapy in cocoa butter


***********************************************


I had made another one a couple of months ago for some of my friends as a christmas gift, and they all loved the idea of it. Here's the one I made for myself, the ones that I made for my friends look exactly like this:


(I apologize if mine looks jacked up, but it has the cute label and ribbon, haha!) 

You can also do this fancy idea if you want to make this for someone who loves to take care of their lips, or will appreciate this gesture :)
**All of the products you can get are in Michaels Craft Store, or your local craft store! (*Ribbon, Label, and Mason Jar*)


**BTW: You don't have to use food coloring at all to your lip scrub, it's only for presentation or if you really want it to have a color. The thought of making a lip scrub with a color seemed cool to me, however you don't need to add it to your lip scrub if you don't want to!


************************************************


I hope this post was somewhat helpful to you guys, seemed like a cool idea, and hope you give it try. :) It's a really easy and fun DIY project, and most of the products are in your kitchen cabinets, which is always a plus! If you give it a try, let me know what you think of it and show me how yours came out. You can always share with me on my, {clickable link} -> (facebook) I will love to see how yours came out :) As always, leave comments and suggestions on what you would like to see next. Don't forget to share with your family and friends, your support would mean so much to me. 

BESOS XO Kristina

Wednesday, October 15, 2014

Review/First Impression + Demo: Makeup Forever Smoky Extravagant Mascara

Hey Everyone!


In todays blog, I will be reviewing the Makeup Forever Smoky Extravagant Mascara. I recieved a "Birthday gift" from sephora and this was one of the gifts they gave me. This mascara has been hyped all over youtube and in the beauty industry. So, I figured since I have the opportunity, I might as well do a review/first impression on this, and I have a demo video of me applying this mascara (which will be later on in the blog) 
The size of this mascara is 0.23 oz, this mascara I have here is only the sample size, and the sample size is 0.16 oz.

Sephora states this mascara to be (*NOT MY WORDS*): "A precision mascara that adds volume, length, and curl. And This clump-free mascara delivers long-lasting wear in one stroke. Using 4D technology, an exclusive micro-defining wax complex envelopes the lash surface in ultrablack pigments for far-away impact and up-close precision. The dual-purpose, cone-shaped brush has a precision tip that separates lashes as the rounded base creates extravagant volume from any distance."


As you can see the brush of this mascara is in a tapered shape, like a cone shape, and is supposed to "help curl the lashes, and volumize the lashes." When I took the mascara wand out, it didn't have much mascara on it. So the bristles of the wand actually prevent from having mascara clump onto the wand. The color I had gotten was black, and I believe it's the only color they have from this line. The formula of this mascara is semi-wet when you first apply it, therefore if I were you, I would start out from the bottom lashes and then onto the top. (In my video I applied it top then bottom, and realized I should of done it the other way, because I gotten some mascara onto my lids) The mascara does eventually set, and dry off to a nice finish. It didn't look clumpy afterwards. 


Here's a video of me applying the mascara:


**I've only applied one coat of mascara in this video, but I ended up applying 2 coats of mascara overall!**

Also, when applying this mascara, I curled my lashes into the wand so that it can grasp on my lashes and get a good amount of product on them. And then I would do this technique where I would carefully blink into the mascara wand to get a good amount of product to the tip of my lashes.


I've applied this mascara at 1:22 pm


As you can see, It doesn't look clumpy at all. My lashes look separated  has some length to it, and looks volumized. Before I applied the mascara, I had curled my lashes. (Yes, these are my real lashes. No falsies!)


Here's the second coat of mascara:


With 2 coats of mascara, it has finally set into my lashes and looks a tad bit darker than applying with one coat. So if you want really black lashes, apply a few coats to your liking. 


Pros from applying the mascara in the beginning:
  • Not clumpy to my lashes at all. Looks clean and fresh
  • Separates my lashes one-by-one
  • Volumized my lashes, made them look va-va-voom ;) 
  • Once the mascara had set, my lashes looked very black and full
No Cons from first application!


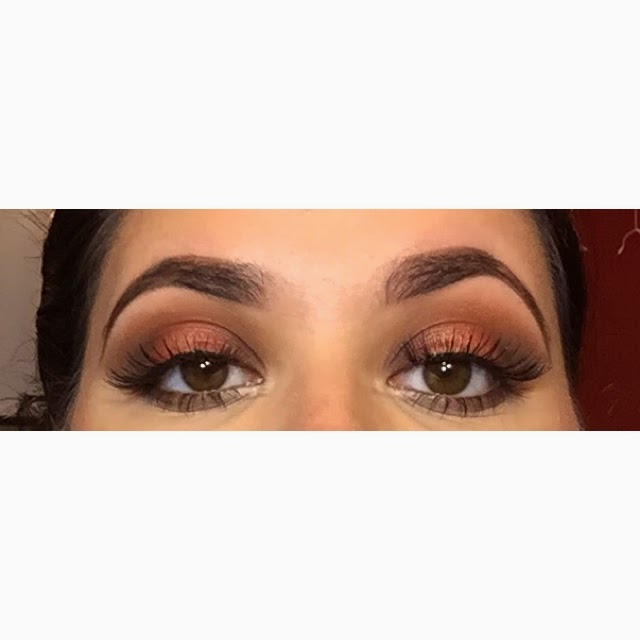
8 Total Hours later:


(Please don't mind my bushy brows in this picture. LOL!)


This picture was taken with flash, and it shows you the true color of the mascara and how sleep deprived I looked! haha. All in all, you can see that on my bottom lash line it did smudge a bit, and a little on the top lash line too, but nothing major. Some of my lashes did stick together on my top lashes. You do see some mascara on my lids. I wouldn't say this mascara is "long lasting", but it can survive a couple of hours. The finish of this mascara is amazing. I did love that my lashes looked so full, it didn't feel heavy on my lashes, it made my lashes darker, it didn't make them look clumpy, and it separated all my lashes but made them voluminous at the same time. And the reason it did that was because the tip of the wand is skinnier where as the bottom of the mascara is more round and fat to make the lashes stand out and more volumized. I give MUF a plus for that! 

On the other hand, the only con I have with this mascara is that it does smudge throughout the day, my best bet is to wear this mascara only to your top lashes and wear another mascara to your bottom lashes. It's not waterproof at all, so if you have allergies or cry it can come off, not runny, but it wouldn't stay on your lashes. Also, another issue I had was my lashes would stick to my bottom lashes sometimes, I don't know if it's because my lashes are long and they naturally do that, or if it was the mascara that did that. When you touch your lashes you do feel a slight stickiness to them, so that could be the reason my lashes did that.

Now the real question is, would I purchase this mascara in the future?
I think it's safe to say I would. Only because it's not that bad of a mascara to be honest. *Remember this was my first time trying this so my opinion could change, and I can do an updated blog on that later on.* It definitely makes my lashes stand out, and darken them. I didn't see any flakes, all it did was smudge on my bottom lash line. I love the mascara wand it has and the formula to it (especially when it sets in). And the actual price to the mascara isn't that expensive at all, it's $24.00 at Sephora. If you are interested in getting it, you can get it (here) Now the only thing is I would only apply this to my top lashes and not my bottom lashes, just to prevent from it smudging on my bottom lashes, and gurrrrrl that is NOT cute!  

I hope this blog post was somewhat helpful to you guys and informative. If you guys are looking to try this out, let me know what you think (positive and negative!) As always, leave comments on suggestions you would like to see next on my blog! ALSO, please let me know how you like these reviews & first impressions. If you want to see more, let me know and I will most definitely do that! <3

Song used in video: Drunk Texting by Chris Brown ft. Jhene Aiko


BESOS XO Kristina


**Just a Disclaimer. I am no way trying to "sell" this product for you to buy, nor trying to bash the product neither. I am not even sponsored by MUF. They don't even know I made this blog post about their "Smoky Extravagant Mascara." These are my truest and honest opinion on how I feel about it, I wouldn't be fake to you guys, that's the last thing I want to do. If I were to be sponsored, then I will let you guys know, first thing in my blog post. Other than that, this whole post was my 100% honest opinions. I hope this cleared up some of your thoughts if you were confused.